Monday, February 28, 2011

Stretching A Die Cut

3:30 AM 6 Comments
This Monday has crept up on me and once again it's my turn to post here on the blog. Last week, I showed you how to use bits and pieces of your die cuts and this week, I'm going to show you how to "stretch" one.

I used the 5 5/8" x 5 5/8" French Flair die on this 8x8 layout to highlight this photo of my son on the day of his Kindergarten graduation.

The die cut was a little shorter than I wanted, so I cut the bottom portion off and then adhered the entire piece as shown below. I adhered a strip of striped patterned paper over the gap and then added the rest of the elements to my page as normal.


Below are the products that I used on this layout:


Thanks for stopping by the blog today! Have a great week!!

Tanisha

Sunday, February 27, 2011

embossed tag - Kianel

3:43 AM 6 Comments
Hello there!
Kianel here with you. Week of the embossing plates it is at Cheery Lynn Designs so today, i am going to show you a tag using embossing plate "daisy garden".
The stamp is from the very last collection of Magnolia stamps for next easter. I used the embossing plate for my background and added ink to enhance the debossed flowers (meaning after embossing, i decided to use the the side of the tag where the backgroung is embossed and the flowers are debossed...does that make any sense?).
To make the big flower i used left overs from my heart project of last week, embossed them, inked them and shaped them into a flower, and finally glued on a circle die.

Products i have used for this tag (click on the picture to get to the product):
Daisy garden Extra Large Embossing Pad Kit - 6"x8" Heart to Heart Doily Circle-Classic LG Stackers Nesting Dies

Voilà, that's it for me today, hope this will help you play with your embossing plates! Have a nice week and forget to pop up by here everyday to see the marvellous creations of my DT mates, love from France, Kianel.

Saturday, February 26, 2011

"Lattice" Impress You with Cheery Lynn Designs Embossing Plates

3:30 AM 5 Comments
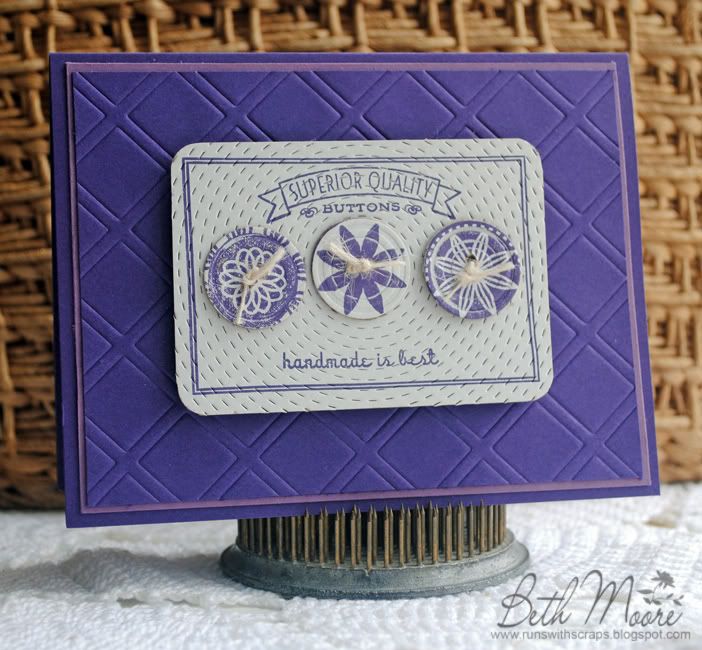
For the past week all of Cheery Lynn Designers have shown you some fun and unique ways to keep your projects from falling flat by using our Grunge and Embossing plates to add dimension to your next papercraft project. Today I have the pleasure of showing you another project that I hope will inspire you to spend a bit of time in your craft room this weekend creating with Cheery Lynn Designs dies and embossing plates.


One of the things that I absolutely love about the Lattice2 die that I used to create the background of this card is that you can use it to die cut your paper (by running it through your machine like you would any other die template) like the cards I showed you in this post right here, or you can use it to emboss (by running it through your machine like an embossing plate with your embossing pads) like I've done with this card I am showing you today. Dies like the Lattice2 and Lattice1 from Cheery Lynn Designs give you so much more for your money because they can be used to emboss or cut... imagine the endless design possibilities made easy with just one die! These Lattice dies are also the perfect size to fit the front of an A2 card exactly and I love that, although today, I trimmed the die cut down a bit to layer it under a lighter shade of purple to add a touch more color to this clean and simple card.


I recently got some new stamps that I knew blended perfectly with the beautiful Dimensional Buttons3. To highlight them for this card, I used a pre-cut piece of chipboard (these ATC size pieces of chipboard come white on one side and brown on the other), and cut three of the larger buttons from one of the chipboard cards. Afterwards, I sorted through my supplies to find a few small "round" stamps that would fit the front of each of the buttons and stamped them for added color and interest. I rounded the edges of another piece of the pre-cut chipboard with my Corner Chomper and ran it through my Big Shot with the Large Round Stitcher Plate  (that's what creates that gorgeous circle faux stitched look on the white chipboard).  I stamped the chipboard piece, tied up the buttons with some twine and then added them to the chipboard. I then adhered the button card to the front of the Lattice2 embossed card front using some Pop Dots for even more dimension. 

Thank you for stopping by the Cheery Lynn Designs blog today, be sure to visit the store to see the entire line of Embossing and Grunge plates available for your next papercrafting project.

Friday, February 25, 2011

Embossing, embellishing and appliqueing with Cheery Lynn

3:30 AM 6 Comments
I sure do hope some have come by today to see the full project that I gave you all a teaser for last week. Remember that tiny picture I shared? Here it is again.


Well, before I share the rest of this project with you, let me share a card I have made with the little Veggies again. Do you know how versatile these dies are? With a little imagination, these dies can be use for really ANY occasion.
Here is one of the Peas decked out like a Cowboy or would that be a Cowpea?


We have been trying to WOW you with Cheery Lynn Designs Embossing Plates. I have used quite a few on this card. I started by cutting my card with Scalloped Circle from the Large Stackers. Then I embossed the circle with the RODEO embossing plate. Because I was using the Core d' nations cardstock, I was able to lightly sand the card front for the embossing pattern to appear.


Do you like all the dangling tags, they are all different branding iron images. They are from the embossing plate called RANCH BRANDS/COWBOY BOOTS & HAT. The boots and hat on the PEA are from the same plate, other side, it is a two sided plate. Also, the rope the tags are dangling from are from the same plate. A very versatile plate, if you ask me!


Other products used on this card are OPTIMISTIC 1/2 inch Font set, MOUNTAINS BORDER DIE, and the GALLOPING HORSE die.

I am not a horse person, but hey, I can make a horse person card, any ole' day!
Now, on to where my comfort zone is!
Cuteness, rhinestones and my kids!
The little teaser picture was a portion of this picture.


My little one LOVES Madame Blueberry! It was my little one's 4th birthday not too long ago. I was at Old Navy and found this very inexpensive skirt and clearance. It was purple and white stripped. I immediately saw Madame Blueberry on there and had to get it for my daughter.


I found a plain white shirt to go along with it, here is the Birthday girl modeling her outfit for you.


She just loves her new outfit! It is truly a one of a kind outfit!


Here is a close up of Madame Blueberry on the skirt.


Oh, yes, she is QUITE the princess!


I used a high grade felt for most of Madame Blueberry's pieces. I used individual rhinestones to write the word PRINCESS above Madame Blueberry's head.


My last tip is that I used a mixture of a high grade fabric glue and Heat n' Bond to attach things to the clothing. For my machine appliqueing, I used a clear nylon thread!


Hope you have enjoyed this project, imagine all the things you can make using your dies for fabric applique.


I am sure to have something fun to share next week, so come back and see! We all love to hear from you so please leave us comments, especially if there is something you'd like to see or know how to do that we have not covered!

TA TA FOR NOW!! This has been Jeannie from The Polka Cabana.

Thursday, February 24, 2011

Cheery Lynn Designs Do It Yourself embossing plate

3:30 AM 7 Comments
For the next few weeks we are going to bring you ideas for using our fabulous Cheery Lynn Designs embossing plates and grunge plates.  For my card today, I used this great XL Do It Yourself embossing plate, it measures a whopping 5 7/8" x 7 1/2".  But first I wanted to share with you some of the ways you can use these plates....

This is what normal embossing will look like, it won't be as crisp as you will get from an embossing folder but it is still a great look.

 To achieve this look, I ran a Distress Ink pad over the plate before adding the paper and running it through my Big Shot.  So you can see the ink is in the debossed areas; a subtle bit of coloring.

This look is from running a Distress Ink direct to paper over the embossing; the nuts, bolts and such are raised so the ink stays primarily on them.  A much bolder look.

And the last technique I have to share today is what I used for my card, I ran my Distress Ink direct to paper on the debossed side, a much more vintage and aged look.


This great image is called Mr Fix It Grandpa from Karen's Doodles.  Other products I used to complete my card; Inverted Scallop Oval Nesting dies for the image,  Lattice 1 and Dimensional Buttons 5.  Finished size is 6" square.

Wednesday, February 23, 2011

More with Embossing Plates

1:30 AM 6 Comments
Well hello there! Its me...Liz. If you're missing Sandy, don't worry, she's feeling a little under the weather today so she'll be here tomorrow with another one of her fabulous creations, I'm sure.

Cheery Lynn Designs has the coolest embossing plates and I'm going to show you a few of them today. One thing I like about these plates are the large size. At 5 7/8 x 7 3/4, they are definitely not just for card makers. I love to use them on my embellies and die cuts to give them great added texture.

Petite Hearts


Dotted Swiss


I used both of these plates in my layout below.

Instead of just leaving the clouds a plain ol' blue, I embossed them with the adorable Petite Hearts plate to make them a little more interesting. What do you like to emboss?

Here is a list of other fabulous Cheery Lynn Designs dies that I used for my project:

Basic Optimistic font
Buttons 3
Never Ending Love Hearts
Circles -Little Stackers Nesting Die
Floral Heart

Tuesday, February 22, 2011

All colors of embossing plates

3:30 AM 6 Comments
For the next couple of weeks we are going to show you the great use of Cheery Lynn Designs embossing plates.. Don't worry- you will see our fantastic cutting dies too, but we want you to try these plates, as some of them are XL size and most of them are double sided and this is a best bargain ever!
So for this week I decided to  move out of my comfort zone and to make this Mixed Media altered homemade tag book using not less then 6 CLD embossing plates and  4 more cutting dies.
As it was intended to be a Mixed Media piece- I  even did 3 inchies  items for the cover with
stamping, embossing and lot of inking.
Then every single tag was embossed with one of those 6 embossing plates , inked and embellished according to the place  shown on the photo strips.
The last one- with this grunge color- I have no idea where this photo  was taken, so I just added
 this ? sign here..
And here are the plates I used:
For my Morocco tag:  Leaves  embossing plate
For my Jerusalem tag: Stones embossing  plate
For my Italy tag: Leaves  XL embossing plate
For my Tel Aviv tag: Bricks embossing  plate
For my " no place" tag: Do it yourself embossing XL plate
Then I used some cutting dies too:
The Little oval stackers for the cover and 3 kinds of  Expression Bubbles for the titles and clouds.
The clouds were made with this die:
Expression Bubble #2
The titles were made with those 2 dies:
Expression Bubble #3 and Expression Bubble #4
Just try those great bubbles- they are 2 layers dies and you can combine 2 cuts from some different papers as I did for this great look and they are fantastic for the mini album titles.
And as always- use our outstanding Embossing pads and Adaptor plate!
Now don't wait! Just go to our shop and shop all those plates and dies to use for your own creative albums.

Monday, February 21, 2011

Birthday Bits And Pieces

3:30 AM 4 Comments
Happy Monday everyone!! Just a few days ago, DT member Beth told you that we were going to be showcasing our "fabulous embossing plates, grunge plates, dimensional dies, stitching and piercing plates" over the next few weeks. Well today, I'm going to show you how to apply these products to your layouts.

I'm sharing 2 birthday layouts that I created about 2 my boys. I tell you, I can not believe that my older son turned 7 just 3 weeks ago and my baby will be 3 in less than 2 months!! Where in the world has the time gone?

I wanted to add just a touch of texture to my background, so I sandwiched the paper between the Desert Floor Embossing Plate and an embossing pad and used a mallet to bang the texture into the paper since it was too big to send through my embossing machine.


Cheery Lynn Designs has a wonderful array of 2" x 3" layered dies that allow you to create the perfect little embellishment for any project. I used the Index Card here to highlight part of my journaling as well as add another red element to my layout.

I am all about incorporating texture onto my layouts! I love how the Piercing Plates not only add texture, but allow me to add perfect stitching (in the case here, faux stitching). All of the holes are pre-punched for you, all you have to do is stitch! How easy is that?

I created textured journaling border strips by die cutting the smallest of the XL French Flair dies and embossing it with Desert Floor. I cut the piece in half and aligned it next to my photo.


On this next birthday layout, I'll show you how to change up the look of a couple of the dies by using small pieces of them.

I added a fun playful look to the Coved Rectangle dies by making them into "tickets". I achieved this look by cutting them half, inking them and then adding a rub-on and penwork.

The XL French Flair die becomes a journaling spot that houses my title. Again, I cut out the die and trimmed off the piece that I needed and saved the rest for another project.


The Dimensional Star Buttons were used as is, but the addition of some colorful baker's twine help to take these over the top.

A plain black circle cut using the Classic XL Circles is used to mat the bowling ball making it pop right off the page!

Below are photos of all of the products that I used on these 2 layouts. Click on each to find it in the store.


I hope you have been inspired to use Cheery Lynn Designs dies in different ways!

Our DT posts a new project every single day, so stop by tomorrow to see what we're up to!!

Until next Monday,

Tanisha

Copyright Statement


All content, including designs, pictures and words are the exclusive property of the author of each blog post. Information shared here is for inspiration only and may not be copied for publication, competition or profit. Thank you for your cooperation.

SOCIAL MEDIA 2


Follow Us @jointhemakersmovement


All content, including designs, pictures and words are the exclusive property of the author of each blog post.
Information shared here is for inspiration only and may not be copied for publication, competition or profit. Thank you for your cooperation.